LPC55Sxx Secure Boot
This notebook describes how to set up a basic secure boot on LPC55Sxx devices using the SPSDK command line utilities, it is based on the application note https://www.nxp.com/docs/en/application-note/AN12283.pdf.
Image preparation
First step is to prepare a binary file in BIN or SREC format. Usually the output from the IDE is in ELF (AXF) format. ELF file cannot be used directly, it needs to be converted to plain (BIN) binary. To get the raw binary file you can for example use the arm-none-eabi-objcopy which is part of the armgcc toolchain. In MCUXpresso You can configure it as a post build step, this is better described here: https://mcuoneclipse.com/2017/03/29/mcuxpresso-ide-s-record-intel-hex-and-binary-files/
Another option is to use the SPSDK nxpimage tool that can convert ELF file to BIN.
[ ]:
%alias execute echo %l && %l
%alias_magic ! execute

import os
import pprint

pp = pprint.PrettyPrinter(indent=4)

WORKSPACE = "workspace/" # change this to path to your workspace
VERBOSITY = "-v" # verbosity of commands, might be -v or -vv for debug or blank for no additional info

ELF_PATH = "lpcxpresso55s69_led_blinky.axf"
BINARY_FILE = WORKSPACE + "lpcxpresso55s69_led_blinky.bin"

# convert the elf file to bin using nxpimage
%! nxpimage $VERBOSITY utils binary-image convert -i $ELF_PATH -f BIN $BINARY_FILE

assert _exit_code == 0
assert os.path.exists(BINARY_FILE)
MBI preparation
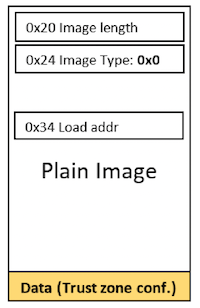
We used the nxpimage tool for image conversion. Nxpimage tool is a successor to an elftosb tool. Plain binary file can be used directly for the unsecure boot. To setup a secure boot we need to generate Master Boot Image (MBI). MBI can also be used directly or as an output to Secure Binary container in addition to raw binary it might contain CRC checksum, certificates and ARM TrustZone configuration.
There are three types of MBI for LP55sxx based on the authentication type: Plain, CRC and Signed and two variants of CRC and Signed images based on the execution target, either XIP (Executed in place) or in RAM.
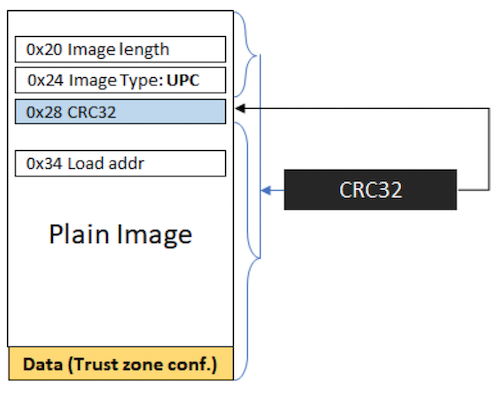
These images contain a CRC32 field computed on the entire image (excluding the CRC32 field).
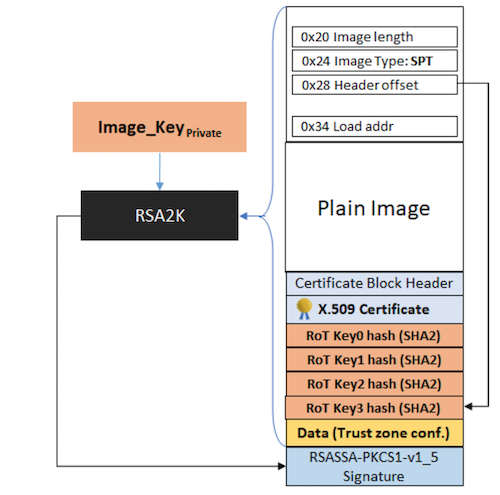
LPC55Sxx devices support booting of RSA2048 signed images using RSASSA-PKCS1-v1_5 signature verification. LPC55Sxx devices support 2048-bit or 4096-bit RSA keys and X.509 V3 certificates. Image validation is a two-step process. The first step is the validation of the X.509 certificate inserted in the image. This contains the image public key used in the second step to validate the entire image (including the certificate) to allow customers to add additional PKI structure. The signed image boot supports up to 4 Root of Trust (RoT) keys and up to 16 Image key certificates with image revocation feature.
Generation of MBI is done with the nxpimage tool. First, we need to get the configuration template that will be used as a starting point
[ ]:
# generate template for mbi
TEMPLATES_PATH = WORKSPACE + "templates"
# choose family for the MCU
FAMILY = "lpc55s6x"

%! nxpimage $VERBOSITY mbi get-templates -f $FAMILY $TEMPLATES_PATH
# just for verification that the template was generated
assert _exit_code == 0
assert os.path.exists(os.path.join(TEMPLATES_PATH, "lpc55s6x_int_xip_signed.yml"))
Now open the lpc55s6x_int_xip_signed.yml with your favorite text editor. You should see a similar file to this:
# ===========  Master Boot Image Configuration template for lpc55s6x, Plain Signed XIP Image.  ===========
# ----------------------------------------------------------------------------------------------------
#                                         == Basic Settings ==
# ----------------------------------------------------------------------------------------------------
family: lpc55s6x  # [Required], MCU family, MCU family name., Possible options:['lpc552x', 'lpc551x', 'lpc55xx', 'lpc55s6x', 'lpc550x', 'lpc55s2x']
outputImageExecutionTarget: Internal flash (XIP) # [Required], Application target, Definition if application is Execute in Place(XiP) or loaded to RAM during reset sequence., Possible options:['Internal flash (XIP)', 'External flash (XIP)', 'Internal Flash (XIP)', 'External Flash (XIP)', 'RAM', 'ram', 'xip']
outputImageAuthenticationType: Signed # [Required], Type of boot image authentication, Specification of final master boot image authentication., Possible options:['Plain', 'CRC', 'Signed', 'Encrypted + Signed', 'encrypted', 'signed', 'crc']
masterBootOutputFile: my_mbi.bin # [Required], Master Boot Image name, The file for Master Boot Image result file.
inputImageFile: my_application.bin # [Required], Plain application image, The input application image to by modified to Master Boot Image.
# ----------------------------------------------------------------------------------------------------
#                                      == Trust Zone Settings ==
# ----------------------------------------------------------------------------------------------------
enableTrustZone: false # [Optional], TrustZone enable option, If not specified, the Trust zone is disabled.
trustZonePresetFile: my_tz_custom.yml # [Optional], TrustZone Customization file, If not specified, but TrustZone is enabled(enableTrustZone) the default values are used.
# ----------------------------------------------------------------------------------------------------
#                                    == Certificate V2 Settings ==
# ----------------------------------------------------------------------------------------------------
mainCertPrivateKeyFile: my_prv_key.pem # [Optional], Main Certificate private key, Main Certificate private key used to sign certificate
imageBuildNumber: 0 # [Optional], Image Build Number, If it's omitted, it will be used 0 as default value.
chainCertificate0File0: chain_certificate0_depth0.pem # [Optional], Chain certificate 0 for root 0, Chain certificate 0 for root certificate 0
chainCertificate0File1: chain_certificate0_depth1.pem # [Optional], Chain certificate 1 for root 0, Chain certificate 1 for root certificate 0
chainCertificate0File2: chain_certificate0_depth2.pem # [Optional], Chain certificate 2 for root 0, Chain certificate 2 for root certificate 0
chainCertificate0File3: chain_certificate0_depth3.pem # [Optional], Chain certificate 3 for root 0, Chain certificate 3 for root certificate 0
chainCertificate1File0: chain_certificate1_depth0.pem # [Optional], Chain certificate 0 for root 1, Chain certificate 0 for root certificate 1
chainCertificate1File1: chain_certificate1_depth1.pem # [Optional], Chain certificate 1 for root 1, Chain certificate 1 for root certificate 1
chainCertificate1File2: chain_certificate1_depth2.pem # [Optional], Chain certificate 2 for root 1, Chain certificate 2 for root certificate 1
chainCertificate1File3: chain_certificate1_depth3.pem # [Optional], Chain certificate 3 for root 1, Chain certificate 3 for root certificate 1
chainCertificate2File0: chain_certificate2_depth0.pem # [Optional], Chain certificate 0 for root 2, Chain certificate 0 for root certificate 2
chainCertificate2File1: chain_certificate2_depth1.pem # [Optional], Chain certificate 1 for root 2, Chain certificate 1 for root certificate 2
chainCertificate2File2: chain_certificate2_depth2.pem # [Optional], Chain certificate 2 for root 2, Chain certificate 2 for root certificate 2
chainCertificate2File3: chain_certificate2_depth3.pem # [Optional], Chain certificate 3 for root 2, Chain certificate 3 for root certificate 2
chainCertificate3File0: chain_certificate3_depth0.pem # [Optional], Chain certificate 0 for root 3, Chain certificate 0 for root certificate 3
chainCertificate3File1: chain_certificate3_depth1.pem # [Optional], Chain certificate 1 for root 3, Chain certificate 1 for root certificate 3
chainCertificate3File2: chain_certificate3_depth2.pem # [Optional], Chain certificate 2 for root 3, Chain certificate 2 for root certificate 3
chainCertificate3File3: chain_certificate3_depth3.pem # [Optional], Chain certificate 3 for root 3, Chain certificate 3 for root certificate 3
mainCertChainId: 0 # [Optional], Main Certificate Chain Index, Index of chain certificate that is used as a main.
# ----------------------------------------------------------------------------------------------------
#                                      == Certificate Settings ==
# ----------------------------------------------------------------------------------------------------
rootCertificate0File: my_certificate0.pem # [Required], Root Certificate File 0, Root certificate file index 0.
rootCertificate1File: my_certificate1.pem # [Optional], Root Certificate File 1, Root certificate file index 1.
rootCertificate2File: my_certificate2.pem # [Optional], Root Certificate File 2, Root certificate file index 2.
rootCertificate3File: my_certificate3.pem # [Optional], Root Certificate File 3, Root certificate file index 3.
mainRootCertId: 0 # [Optional], Main Certificate Index, Index of certificate that is used as a main.
Required fields are marked with [Required] in the comment. We have to change path to masterBootOutputFile that will contain our resulting MBI and inputImageFile which is source image. In this example we won’t enable TrustZone. However, we need to set certificates, for our example we set one root certificate and one chain certificate.
# ===========  Master Boot Image Configuration template for lpc55s6x, Plain Signed XIP Image.  ===========
# ----------------------------------------------------------------------------------------------------
#                                         == Basic Settings ==
# ----------------------------------------------------------------------------------------------------
family: lpc55s6x  # [Required], MCU family, MCU family name., Possible options:['lpc552x', 'lpc551x', 'lpc55xx', 'lpc55s6x', 'lpc550x', 'lpc55s2x']
outputImageExecutionTarget: Internal flash (XIP) # [Required], Application target, Definition if application is Execute in Place(XiP) or loaded to RAM during reset sequence., Possible options:['Internal flash (XIP)', 'External flash (XIP)', 'Internal Flash (XIP)', 'External Flash (XIP)', 'RAM', 'ram', 'xip']
outputImageAuthenticationType: Signed # [Required], Type of boot image authentication, Specification of final master boot image authentication., Possible options:['Plain', 'CRC', 'Signed', 'Encrypted + Signed', 'encrypted', 'signed', 'crc']
masterBootOutputFile: my_mbi.bin # [Required], Master Boot Image name, The file for Master Boot Image result file.
inputImageFile: my_application.bin # [Required], Plain application image, The input application image to by modified to Master Boot Image.
# ----------------------------------------------------------------------------------------------------
#                                    == Certificate V2 Settings ==
# ----------------------------------------------------------------------------------------------------
mainCertPrivateKeyFile: my_prv_key.pem # [Optional], Main Certificate private key, Main Certificate private key used to sign certificate
chainCertificate0File0: chain_certificate0_depth0.pem # [Optional], Chain certificate 0 for root 0, Chain certificate 0 for root certificate 0
mainCertChainId: 0 # [Optional], Main Certificate Chain Index, Index of chain certificate that is used as a main.
# ----------------------------------------------------------------------------------------------------
#                                      == Certificate Settings ==
# ----------------------------------------------------------------------------------------------------
rootCertificate0File: my_certificate0.pem # [Required], Root Certificate File 0, Root certificate file index 0.
mainRootCertId: 0 # [Optional], Main Certificate Index, Index of certificate that is used as a main.
Keys preparation
First we need to generate private key that will be used to sign certificates. We can use nxpcrypto app for this purpose. We need to create RSA 2048 keys (NXP Protocol version 1.0) or RSA4096.
[ ]:
# generate RSA 2048 public and private key
PRIVATE_KEY_PATH = WORKSPACE + "rsa2048_key.pem"
PUBLIC_KEY_PATH = WORKSPACE + "rsa2048_key.pub"

%! nxpcrypto $VERBOSITY key generate -k rsa2048 $PRIVATE_KEY_PATH --force
assert _exit_code == 0

# verify that keys were generated
assert os.path.exists(PRIVATE_KEY_PATH)
assert os.path.exists(PUBLIC_KEY_PATH)
Certificates preparation
Then we need to create certificates. As we already mentioned we will create one root certificate and one chain certificate. We will again use nxpcrypto app. First we need to get template.
[ ]:
# obtain a template for root cert
ROOT_CERT_CONFIG_PATH = WORKSPACE + "root_cert_template.yml"
%! nxpcrypto $VERBOSITY cert get-template $ROOT_CERT_CONFIG_PATH --force
assert _exit_code == 0

# obtain a template for root cert
CHAIN_CERT_CONFIG_PATH = WORKSPACE + "chain_cert_template.yml"
%! nxpcrypto $VERBOSITY cert get-template $CHAIN_CERT_CONFIG_PATH --force
assert _exit_code == 0
Configuration template for certificates should look like this:
# This is template for configuration file used for generating certificates

# ==============================================
# Issuer identification fields
# ==============================================
# All available option can be found within class NameOID in
# cryptography/src/cryptography/x509/oid.py at https://github.com/pyca/cryptography

issuer:
  COMMON_NAME: NXP
  COUNTRY_NAME: CZ
  LOCALITY_NAME: Roznov pod Radhostem
  STATE_OR_PROVINCE_NAME: Morava
  STREET_ADDRESS: 1.maje 1009
  ORGANIZATION_NAME: SPSDK Team

# ==============================================
# Subject identification fields
# ==============================================
# All available option can be found within class NameOID in
# cryptography/src/cryptography/x509/oid.py at https://github.com/pyca/cryptography
subject:
  COMMON_NAME: NXP - SPSDK
  COUNTRY_NAME: CZ
  LOCALITY_NAME: Roznov pod Radhostem
  STATE_OR_PROVINCE_NAME: Morava
  STREET_ADDRESS: 1.maje 1009
  ORGANIZATION_NAME: SPSDK Team
  POSTAL_CODE: 756 61

# ==============================================
# The certificate settings
# ==============================================

# Path, where issuer private key is stored
issuer_private_key: issuer_key.pem
# Path, where subject public key is stored
subject_public_key: subject_key.pub
# Serial number of certificate
serial_number: 12346578
# Validity duration in days
duration: 3650

# ==============================================
# Certificate basic extensions
# ==============================================
extensions:
  BASIC_CONSTRAINTS:
    # Delegate certificate as a signing authority to create an intermediate certificates.
    ca: false  # Valid values true|false
    # Integer length of the path of certificate signature from a given certificate, back to the root certificate
    path_length: 0
Certificates are in x.509 format and should be DER encoded. Root certificates must have ca (Certificate authority) set to true and must be self-signed. That means that issuer must be same as a subject.
[ ]:
ROOT_0_CERT_PATH = WORKSPACE + "ROT1_sha256_2048_65537_v3_ca_crt.der"
CHAIN_CERT_0 = WORKSPACE + "IMG1_1_sha256_2048_65537_v3_usr_key.pem"

import yaml

assert os.path.exists(ROOT_CERT_CONFIG_PATH)
assert os.path.exists(CHAIN_CERT_CONFIG_PATH)

# Create configuration for root certificate
with open(ROOT_CERT_CONFIG_PATH) as cert_config:
    # load yaml configuration to dictionary
    cert = yaml.safe_load(cert_config)
    # make certificate self-signed
    cert['subject'] = cert['issuer']
    # change certificate authority to True
    cert['extensions']['BASIC_CONSTRAINTS']['ca'] = True
    # change path to private and public keys
    cert['issuer_private_key'] = PRIVATE_KEY_PATH
    cert['subject_public_key'] = PUBLIC_KEY_PATH

with open(ROOT_CERT_CONFIG_PATH, "w+") as cert_config:
    print("Root Certificate config:")
    pp.pprint(cert)
    # dump the dictionary back to YAML
    yaml.dump(cert, cert_config)

# Create configuration for chain certificate
with open(CHAIN_CERT_CONFIG_PATH) as cert_config:
    # load yaml configuration to dictionary
    cert = yaml.safe_load(cert_config)
    # change certificate authority to False
    cert['extensions']['BASIC_CONSTRAINTS']['ca'] = False
    # change path to private and public keys
    cert['issuer_private_key'] = PRIVATE_KEY_PATH
    cert['subject_public_key'] = PUBLIC_KEY_PATH

with open(CHAIN_CERT_CONFIG_PATH, "w+") as cert_config:
    print("Chain certificate config:")
    pp.pprint(cert)
    # dump the dictionary back to YAML
    yaml.dump(cert, cert_config)

# Generate root certificate
%! nxpcrypto $VERBOSITY cert generate -c $ROOT_CERT_CONFIG_PATH -e DER -o $ROOT_0_CERT_PATH --force
assert _exit_code == 0
# Generate chain certificate
%! nxpcrypto $VERBOSITY cert generate -c $CHAIN_CERT_CONFIG_PATH -e DER -o $CHAIN_CERT_0 --force
assert _exit_code == 0

# verify that certificates were generated
assert os.path.exists(ROOT_0_CERT_PATH)
assert os.path.exists(CHAIN_CERT_0)
MBI generation
We have created certificates and keys required for the creation of Master Boot Image. So now it’s time to create a MBI.
[ ]:
MBI_BIN_NAME = "lpc55s6x_mbi.bin"
MBI_CONFIG_PATH = WORKSPACE + "mbi_config_lpc55s6x.yml"


mbi_config = f"""# ===========  Master Boot Image Configuration template for lpc55s6x, Plain Signed XIP Image.  ===========
# ----------------------------------------------------------------------------------------------------
#                                         == Basic Settings ==
# ----------------------------------------------------------------------------------------------------
family: {FAMILY}  # [Required], MCU family, MCU family name., Possible options:['lpc552x', 'lpc551x', 'lpc55xx', 'lpc55s6x', 'lpc550x', 'lpc55s2x']
outputImageExecutionTarget: Internal flash (XIP) # [Required], Application target, Definition if application is Execute in Place(XiP) or loaded to RAM during reset sequence., Possible options:['Internal flash (XIP)', 'External flash (XIP)', 'Internal Flash (XIP)', 'External Flash (XIP)', 'RAM', 'ram', 'xip']
outputImageAuthenticationType: Signed # [Required], Type of boot image authentication, Specification of final master boot image authentication., Possible options:['Plain', 'CRC', 'Signed', 'Encrypted + Signed', 'encrypted', 'signed', 'crc']
masterBootOutputFile: {MBI_BIN_NAME} # [Required], Master Boot Image name, The file for Master Boot Image result file.
inputImageFile: {BINARY_FILE} # [Required], Plain application image, The input application image to by modified to Master Boot Image.
# ----------------------------------------------------------------------------------------------------
#                                    == Certificate V2 Settings ==
# ----------------------------------------------------------------------------------------------------
mainCertPrivateKeyFile: {PRIVATE_KEY_PATH} # [Optional], Main Certificate private key, Main Certificate private key used to sign certificate
chainCertificate0File0: {CHAIN_CERT_0} # [Optional], Chain certificate 0 for root 0, Chain certificate 0 for root certificate 0
mainCertChainId: 0 # [Optional], Main Certificate Chain Index, Index of chain certificate that is used as a main.
# ----------------------------------------------------------------------------------------------------
#                                      == Certificate Settings ==
# ----------------------------------------------------------------------------------------------------
rootCertificate0File: {ROOT_0_CERT_PATH} # [Required], Root Certificate File 0, Root certificate file index 0.
mainRootCertId: 0 # [Optional], Main Certificate Index, Index of certificate that is used as a main."""

# write configuration tp file
with open(MBI_CONFIG_PATH, "w+") as mbi_file:
    mbi_file.write(mbi_config)

assert os.path.exists(MBI_CONFIG_PATH)

# export Master Boot Image
%! nxpimage $VERBOSITY mbi export $MBI_CONFIG_PATH
assert _exit_code == 0

BIN_OUTPUT_PATH = WORKSPACE + MBI_BIN_NAME
assert os.path.exists(BIN_OUTPUT_PATH)
Now we have a bootable MBI that we could test, but in order to do that we have to configure PFR.
PFR
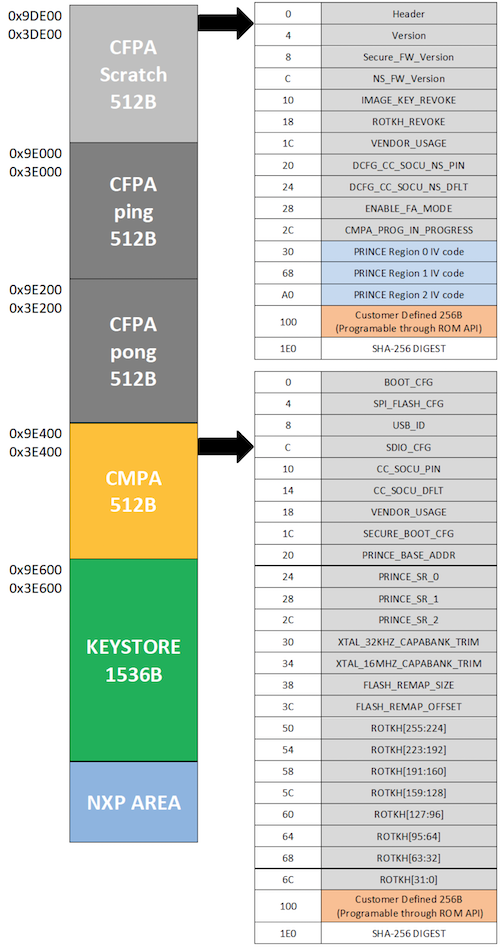
PFR - Protected Flash Region. LPC55Sxx contains configuration for the boot ROM in flash region which is protected. This protected region contains settings of boot configuration, security policy, PRINCE settings and so on.
Protected Flash Region with four regions: 1. Customer in-field Programming Area (CFPA) - Image revoke - RoT key revoke 2. Customer Manufacturing Programming Area (CMPA) - Boot configuration - RoT key table hash - Debug configuration - Prince configuration 3. Key Storage for PUF 4. NXP unique ID and manufacturing system
For PFR configuration there’s tool PFR. Let’s prepare PFR configuration for CFPA and CMPA pages.
[ ]:
CMPA_TEMPLATE_PATH = WORKSPACE + "cmpa_lpc55s6x.yml"
CFPA_TEMPLATE_PATH = WORKSPACE + "cfpa_lpc55s6x.yml"

# get CMPA template
%! pfr get-template -t cmpa -d $FAMILY -o $CMPA_TEMPLATE_PATH
assert _exit_code == 0

# get CFPA template
%! pfr get-template -t cfpa -d $FAMILY -o $CFPA_TEMPLATE_PATH
assert _exit_code == 0
CMPA page preparation
[ ]:
assert os.path.exists(CMPA_TEMPLATE_PATH)

CMPA_BIN = WORKSPACE + "cmpa.bin"

with open(CMPA_TEMPLATE_PATH) as cmpa_config:
    # load yaml configuration to dictionary
    cmpa = yaml.safe_load(cmpa_config)
    # Enable secure boot
    cmpa['settings']['SECURE_BOOT_CFG']['bitfields']['SEC_BOOT_EN'] = "SECURE_BOOT_CFG_SEC_BOOT_EN_ENABLE_0"
    # disable DICE
    cmpa['settings']['SECURE_BOOT_CFG']['bitfields']['SKIP_DICE'] = "SECURE_BOOT_CFG_SKIP_DICE_DISABLE_0"

with open(CMPA_TEMPLATE_PATH, "w+") as cmpa_config:
    print("CMPA config:")
    pp.pprint(cmpa)
    # dump the dictionary back to YAML
    yaml.dump(cmpa, cmpa_config)

# Generate CMPA binary
%! pfr $VERBOSITY generate-binary -c $CMPA_TEMPLATE_PATH -o $CMPA_BIN -e $MBI_CONFIG_PATH
assert _exit_code == 0

assert os.path.exists(CMPA_BIN)
Device preparation
Now it’s time to prepare the device (enroll keys, load pfr…). In this example we will use LPCXpresso55S69 Evaluation kit.
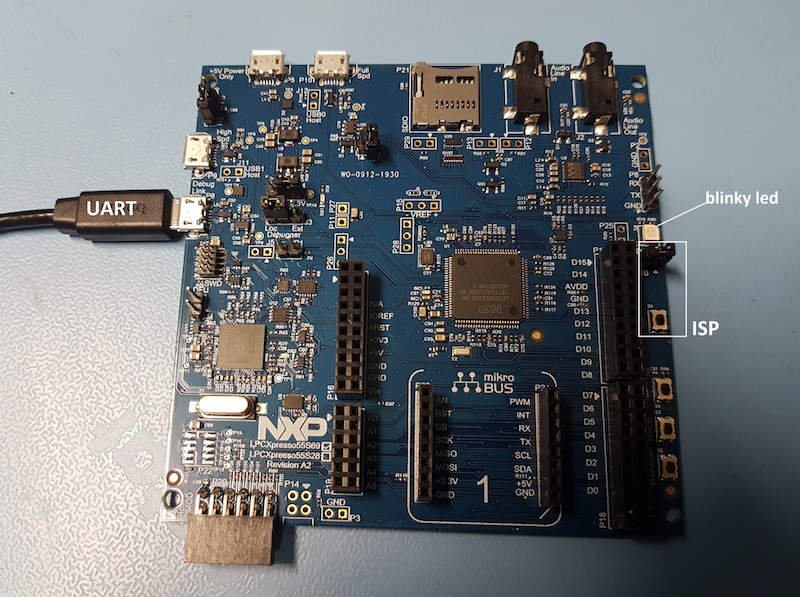
First step is to enter ISP mode, this could be achieved by either shorting J10 or by simultaneously pressing ISP button and reset button.
LPCXpresso55S69 supports UART and USB-HID interface for the ISP programming. In the picture below we used UART, if you want to use USB, connect the cable to high speed USB port.
We could use app nxpdevscan to check if the device is connected to the PC in ISP mode.
[ ]:
# check if the device is connected and detected by PC
%! nxpdevscan
[ ]:
USB_CONNECTION = "-u lpc55"
# choose com port or /dev
UART_CONNECTION = "-p com6"

# comment if you want to use UART
CONNECTION = USB_CONNECTION
# CONNECTION = UART_CONNECTION

%! blhost $CONNECTION get-property current-version
assert _exit_code == 0
Key store erase
You might erase key store by writing a file containing zero bytes with size 3*512 = 1536 B.
[ ]:
# first you need to set property 29 - PFR key store update option
%! blhost $CONNECTION set-property 29 1
assert _exit_code == 0

# now write the file containing zero bytes to the location of key store
%! blhost $CONNECTION write-memory 0x9E600 zero_1536.bin
assert _exit_code == 0

# set the property 29 back to 0
%! blhost $CONNECTION set-property 29 0
assert _exit_code == 0
CFPA page preparation
By default, the CFPA (Customer field programmable area) page is cleared. There are registers related to secure boot. ROTKH_REVOKE field at CFPA page has to be set up to accept signed images with created certificates.
So we have to enable root key 0 (RoTK0_EN). Another important register is VERSION, it’s monotonic counter which needs to be incremented after every CFPA page update.
In this example we will create unsealed versions of CMPA and CFPA, it means that they could be updated. Sealed (locked) version of CFPA and CMPA might be generated using the -a or –add-seal option.
[ ]:
CFPA_BIN = WORKSPACE + "cfpa.bin"
CFPA_PARSED = WORKSPACE + "cfpa_parsed.yaml"

# First, read the current CFPA page on the procesor and parse it to YAML, show only differences
%! pfr read -d $FAMILY $CONNECTION -t cfpa -o $CFPA_BIN -y $CFPA_PARSED --show-diff

assert os.path.exists(CFPA_TEMPLATE_PATH)
assert os.path.exists(CFPA_PARSED)

with open(CFPA_PARSED) as cfpa_parsed:
    # load yaml configuration to dictionary
    cfpa = yaml.safe_load(cfpa_parsed)
    print("Parsed CFPA from the processor")
    pp.pprint(cfpa)
    # parse actual value of the VERSION monotonic counter
    CFPA_VERSION = int(cfpa['settings']['VERSION']['value'], 16)

with open(CFPA_TEMPLATE_PATH) as cfpa_config:
    # load yaml configuration to dictionary
    cfpa = yaml.safe_load(cfpa_config)
    # Enable root certificate 0
    cfpa['settings']['ROTKH_REVOKE']['bitfields']['RoTK0_EN'] = "ROTKH_REVOKE_RoTK0_EN_ENABLED"
    # VERSION monotonic counter has to be increased after every CFPA page update
    CFPA_VERSION += 1
    cfpa['settings']['VERSION']['value'] = hex(CFPA_VERSION)

with open(CFPA_TEMPLATE_PATH, "w+") as cfpa_config:
    print("CFPA config:")
    pp.pprint(cfpa)
    # dump the dictionary back to YAML
    yaml.dump(cfpa, cfpa_config)


# Generate CFPA binary
%! pfr $VERBOSITY generate-binary -c $CFPA_TEMPLATE_PATH -o $CFPA_BIN
assert _exit_code == 0

assert os.path.exists(CFPA_BIN)
PFR write
Now that we have enrolled key store, it’s time to write CFPA and CMPA pages. We could use pfr tool or blhost.
[ ]:
# write CFPA
%! pfr write $CONNECTION -t cfpa -d $FAMILY -b $CFPA_BIN
assert _exit_code == 0
# this is the same as
#%! blhost $CONNECTION write-memory 0x0009DE00 $CFPA_BIN"

# write CMPA
%! pfr write $CONNECTION -t cmpa -d $FAMILY -b $CMPA_BIN
assert _exit_code == 0
Write MBI
Last step is to write master boot image to device.
[ ]:
# Erase flash first
%! blhost $CONNECTION flash-erase-region 0 0x10000
assert _exit_code == 0

# write MBI
%! blhost $CONNECTION write-memory 0 $BIN_OUTPUT_PATH
assert _exit_code == 0