Debug authentication on MCXN9XX#
Introduction#
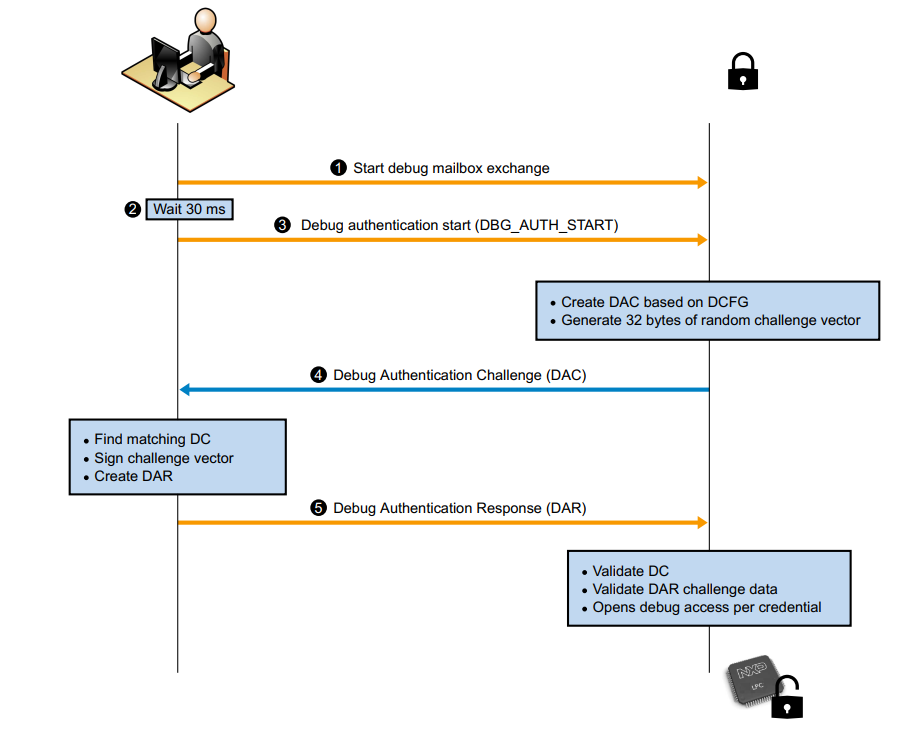
The fundamental principles of debugging, which require access to the system state and system information, conflict with the principles of security, which require the restriction of access to assets. Thus, many products disable debug access completely before deploying the product. To address these challenges, the chip offers a debug authentication protocol as a mechanism to authenticate the debugger (an external entity) has the credentials approved by the product manufacturer before granting debug access to the device. The debug authentication is a challenge-response scheme and assures that only the debugger in possession of the required debug credentials can successfully authenticate over the debug interface and access restricted parts of the device.
The protocol is divided into steps as described below:
The debugger initiates the Debug Mailbox message exchange by setting the CSW[RESYNCH_REQ] bit and CSW[CHIP_RESET_REQ] bit of DM-AP.
The debugger waits (minimum 30 ms) for the devices to restart and enter debug mailbox request handling loop.
The debugger sends Debug Authentication Start command (command code 10h) to the device.
The device responds back with Debug Authentication Challenge (DAC) packet based on the debug access rights preconfigured in CMPA fields, which are collectively referred as Device Credential Constraints Configuration (DCFG_CC). The response packet also contains a 32 bytes random challenge vector.
The debugger responds to the challenge with a Debug Authentication Response (DAR) message by using an appropriate debug certificate, matching the device identifier in the DAC. The DAR packet contains the debug access permission certificate, also referred as Debug Credential (DC), and a cryptographic signature binding the DC and the challenge vector provided in the DAC.
The device on receiving the DAR, validates the contents by verifying the cryptographic signature of the message using the debugger’s public key present in the embedded the Debug Credential (DC). On successful validation of DAR, the device enables access to the debug domains permitted in the DC
WARNING! :warning:#
This configuration is used only for demonstration purpose. For final security device configuration go through all configuration possibilities and define your own specific config/keys.
Let’s prepare the environment#
%run ../init_notebook.ipynb

import os
import pprint

pp = pprint.PrettyPrinter(indent=4)

WORKSPACE = "workspace/" # change this to path to your workspace
KEYS = "../_data/keys/ecc256/" # change this to path to your keys
VERBOSITY = "" # verbosity of commands, might be -v or -vv for debug or blank for no additional info
# choose family
FAMILY = "mcxn9xx"
env: JUPYTER_SPSDK=1
Created `%!` as an alias for `%execute`.
Device preparation#
Now it’s time to prepare the device. In this example we will use X-MCXN9XX-EVK board. This is example board configuration without external debugger. It is also possible to use configuration with external debugger such as JLink debug probe.

Prepare device, erase previous settings and use app nxpdevscan to check if the device is connected to the PC in ISP mode.
# prepare the board so that there is no previous settings
%! nxpdebugmbox -i jlink erase
# enter ISP mode
%! nxpdebugmbox -i jlink ispmode -m 0
# check if the device is connected and detected by PC
%! nxpdevscan
nxpdebugmbox -i jlink erase
  #   Interface   Id           Description
-------------------------------------------------------------------
  0   Jlink       1063207870   Segger J-Link MCU-Link: 1063207870
Mass flash erase succeeded
nxpdebugmbox -i jlink ispmode -m 0
  #   Interface   Id           Description
-------------------------------------------------------------------
  0   Jlink       1063207870   Segger J-Link MCU-Link: 1063207870
Entering into ISP mode succeeded
nxpdevscan
-------- Connected NXP SDIO Devices --------

-------- Connected NXP USB Devices --------

-------- Connected NXP UART Devices --------

Port: COM9
Type: mboot device

-------- Connected NXP SIO Devices --------
# choose USB or UART interface based on the result of nxpdevscan
# USB = "-u 0x1fc9,0x14f"
UART = '-p COM9'

# check if the board responds in ISP mode
%! blhost $UART get-property 1
# Response word 2 for get-property 17 is LC_STATE.
%! blhost $UART get-property 17
blhost -p COM9 get-property 1
Response status = 0 (0x0) Success.
Response word 1 = 1258488320 (0x4b030200)
Current Version = K3.2.0
blhost -p COM9 get-property 17
Response status = 0 (0x0) Success.
Response word 1 = 1520786085 (0x5aa55aa5)
Response word 2 = 3 (0x3)
Security State = UNSECURE
Generate RoT + Debug auth keys#
First we need to generate Root of Trust Keys (RoTKs)/Super Root Keys (SRKs), Debug Credential Key (DCK) and Image Signing Key (ISK). In this example, we will use nxpcrypto app to generate secp256r1 keys (see How-to-get-keys-using-nxpcrypto). Script by default load 4 RoTKs, 1 DCK and 1 ISK. Feel free to modify it according your needs. At least one RoTK is mandatory.
See the script’s comments and modify the script according to the application security requirements.
# load generated key pair for ROTK0
ROTK0_PRIVATE_KEY_PATH = KEYS + "srk0_ecc256.pem"
ROTK0_PUBLIC_KEY_PATH = KEYS + "srk0_ecc256.pub"
# verify that keys were loaded
assert os.path.exists(ROTK0_PRIVATE_KEY_PATH)
assert os.path.exists(ROTK0_PUBLIC_KEY_PATH)

# load generated key pair for ROTK1
ROTK1_PRIVATE_KEY_PATH = KEYS + "srk1_ecc256.pem"
ROTK1_PUBLIC_KEY_PATH = KEYS + "srk1_ecc256.pub"
# verify that keys were loaded
assert os.path.exists(ROTK1_PRIVATE_KEY_PATH)
assert os.path.exists(ROTK1_PUBLIC_KEY_PATH)

# load generated key pair for ROTK2
ROTK2_PRIVATE_KEY_PATH = KEYS + "srk2_ecc256.pem"
ROTK2_PUBLIC_KEY_PATH = KEYS + "srk2_ecc256.pub"
# verify that keys were loaded
assert os.path.exists(ROTK2_PRIVATE_KEY_PATH)
assert os.path.exists(ROTK2_PUBLIC_KEY_PATH)

# load generated key pair for ROTK3
ROTK3_PRIVATE_KEY_PATH = KEYS + "srk3_ecc256.pem"
ROTK3_PUBLIC_KEY_PATH = KEYS + "srk3_ecc256.pub"
# verify that keys were loaded
assert os.path.exists(ROTK3_PRIVATE_KEY_PATH)
assert os.path.exists(ROTK3_PUBLIC_KEY_PATH)

# load generated key pair for DCK
DCK_PRIVATE_KEY_PATH = KEYS + "dck_ecc256.pem"
DCK_PUBLIC_KEY_PATH = KEYS + "dck_ecc256.pub"
# verify that keys were loaded
assert os.path.exists(DCK_PRIVATE_KEY_PATH)
assert os.path.exists(DCK_PUBLIC_KEY_PATH)

# load generated key pair for ISK
ISK_PRIVATE_KEY_PATH = KEYS + "imgkey_ecc256.pem"
ISK_PUBLIC_KEY_PATH = KEYS + "imgkey_ecc256.pub"
# verify that keys were loaded
assert os.path.exists(ISK_PRIVATE_KEY_PATH)
assert os.path.exists(ISK_PUBLIC_KEY_PATH)
Generate config files for debug auth#
First we need to generate template for debug credentials configuration file.
DC_CONFIG_TEMPLATE = WORKSPACE + "dc_config.yml"
%! nxpdebugmbox get-template --force -o $DC_CONFIG_TEMPLATE
assert os.path.exists(DC_CONFIG_TEMPLATE)
nxpdebugmbox get-template --force -o workspace/dc_config.yml
The configuration template file has been created.
In order to generate the DC file, we need to modify yaml config accordingly.
import yaml
# Modify configuration for dc
with open(DC_CONFIG_TEMPLATE) as dc_config:
    # load yaml configuration to dictionary
    dc = yaml.safe_load(dc_config)
    # change paths
    dc['socc'] = 0x0006
    dc['cc_socu'] = 0x7FF
    del dc['rot_meta']
    dc['rot_meta'] = [
            ROTK0_PUBLIC_KEY_PATH,
            ROTK1_PUBLIC_KEY_PATH,
            ROTK2_PUBLIC_KEY_PATH,
            ROTK3_PUBLIC_KEY_PATH,
    ]
    dc['rotk'] = ROTK0_PRIVATE_KEY_PATH
    dc['dck'] = DCK_PUBLIC_KEY_PATH
    dc['cc_beacon'] = 0
    del dc['sign_provider']

with open(DC_CONFIG_TEMPLATE, "w+") as dc_config:
    # dump the dictionary back to YAML
    yaml.dump(dc, dc_config)
Now we generate dc file based on yaml configuration.
DC_FILE_PATH = WORKSPACE + "debug_auth.dc"
%! nxpdebugmbox -p 2.0 gendc -c $DC_CONFIG_TEMPLATE -o $DC_FILE_PATH --force
nxpdebugmbox -p 2.0 gendc -c workspace/dc_config.yml -o workspace/debug_auth.dc --force
RKTH: dc74a049881288ac7cfe74429c73bba49f79ef607452858469fcafe8090b2153
Creating Debug credential file succeeded
Generate CMPA + CFPA config for debug authentication#
First create templates for CMPA and CFPA.
CFPA_CONFIG_TEMPLATE = WORKSPACE + "cfpa_mcxn9xx_debug_auth.yaml"
CMPA_CONFIG_TEMPLATE = WORKSPACE + "cmpa_mcxn9xx_debug_auth.yaml"
%! pfr get-template -t cfpa -f $FAMILY -o $CFPA_CONFIG_TEMPLATE --force
%! pfr get-template -t cmpa -f $FAMILY -o $CMPA_CONFIG_TEMPLATE --force
pfr get-template -t cfpa -f mcxn9xx -o workspace/cfpa_mcxn9xx_debug_auth.yaml --force
PFR cfpa configuration template has been created.
Result has been stored in: C:\repos\spsdk_master_2.0\examples\jupyter_examples\mcxn9xx_debug_auth\workspace\cfpa_mcxn9xx_debug_auth.yaml
pfr get-template -t cmpa -f mcxn9xx -o workspace/cmpa_mcxn9xx_debug_auth.yaml --force
PFR cmpa configuration template has been created.
Result has been stored in: C:\repos\spsdk_master_2.0\examples\jupyter_examples\mcxn9xx_debug_auth\workspace\cmpa_mcxn9xx_debug_auth.yaml
Now we need to modify yaml config accordingly for both CMPA and CFPA
with open(CFPA_CONFIG_TEMPLATE) as cfpa_config:
    # load yaml configuration to dictionary
    cfpa = yaml.safe_load(cfpa_config)
    # change paths
    cfpa['settings']['CFPA_PAGE_VERSION']['bitfields']['CFPA_PAGE_VERSION'] = 1

    cfpa['settings']['DCFG_CC_SOCU_NS_PIN']['bitfields']['ISP_CMD_EN'] = 'FIXED_STATE'
    cfpa['settings']['DCFG_CC_SOCU_NS_DFLT']['bitfields']['ISP_CMD_EN'] = 'ENABLED'

    cfpa['settings']['DCFG_CC_SOCU_NS_PIN']['bitfields']['FA_CMD_EN'] = 'FIXED_STATE'
    cfpa['settings']['DCFG_CC_SOCU_NS_DFLT']['bitfields']['FA_CMD_EN'] = 'ENABLED'

    cfpa['settings']['DCFG_CC_SOCU_NS_PIN']['bitfields']['ME_CMD_EN'] = 'FIXED_STATE'
    cfpa['settings']['DCFG_CC_SOCU_NS_DFLT']['bitfields']['ME_CMD_EN'] = 'ENABLED'

with open(CFPA_CONFIG_TEMPLATE, "w+") as cfpa_config:
    # dump the dictionary back to YAML
    yaml.dump(cfpa, cfpa_config)
with open(CMPA_CONFIG_TEMPLATE) as cmpa_config:
    # load yaml configuration to dictionary
    cmpa = yaml.safe_load(cmpa_config)
    # change paths
    cmpa['settings']['DCFG_CC_SOCU_PIN']['bitfields']['ISP_CMD_EN'] = 'FIXED_STATE'
    cmpa['settings']['DCFG_CC_SOCU_DFLT']['bitfields']['ISP_CMD_EN'] = 'ENABLED'

    cmpa['settings']['DCFG_CC_SOCU_PIN']['bitfields']['FA_CMD_EN'] = 'FIXED_STATE'
    cmpa['settings']['DCFG_CC_SOCU_DFLT']['bitfields']['FA_CMD_EN'] = 'ENABLED'

    cmpa['settings']['DCFG_CC_SOCU_PIN']['bitfields']['ME_CMD_EN'] = 'FIXED_STATE'
    cmpa['settings']['DCFG_CC_SOCU_DFLT']['bitfields']['ME_CMD_EN'] = 'ENABLED'

with open(CMPA_CONFIG_TEMPLATE, "w+") as cmpa_config:
    # dump the dictionary back to YAML
    yaml.dump(cmpa, cmpa_config)
MBI generation#
First create templates for MBI.
# generate template for mbi
TEMPLATES_PATH = WORKSPACE + "MBI"

%! nxpimage $VERBOSITY mbi get-templates -f $FAMILY -o $TEMPLATES_PATH --force
# just for verification that the template was generated
assert os.path.exists(os.path.join(TEMPLATES_PATH, "mcxn9xx_xip_signed.yaml"))
nxpimage  mbi get-templates -f mcxn9xx -o workspace/MBI --force
Creating C:\repos\spsdk_master_2.0\examples\jupyter_examples\mcxn9xx_debug_auth\workspace\MBI\mcxn9xx_xip_plain.yaml template file.
Creating C:\repos\spsdk_master_2.0\examples\jupyter_examples\mcxn9xx_debug_auth\workspace\MBI\mcxn9xx_xip_crc.yaml template file.
Creating C:\repos\spsdk_master_2.0\examples\jupyter_examples\mcxn9xx_debug_auth\workspace\MBI\mcxn9xx_xip_signed.yaml template file.
Creating C:\repos\spsdk_master_2.0\examples\jupyter_examples\mcxn9xx_debug_auth\workspace\MBI\mcxn9xx_load_to_ram_plain.yaml template file.
Creating C:\repos\spsdk_master_2.0\examples\jupyter_examples\mcxn9xx_debug_auth\workspace\MBI\mcxn9xx_load_to_ram_crc.yaml template file.
Creating C:\repos\spsdk_master_2.0\examples\jupyter_examples\mcxn9xx_debug_auth\workspace\MBI\mcxn9xx_load_to_ram_signed.yaml template file.
For signed images, we need to create a certificate blok separately. In order to do this, use nxpimage cert-block get-template command as described below.
CERT_BLOCK_TEMPLATE = WORKSPACE +"cert_block_mcxn9xx.yaml"
%! nxpimage $VERBOSITY cert-block get-template -f $FAMILY -o $CERT_BLOCK_TEMPLATE --force
nxpimage  cert-block get-template -f mcxn9xx -o workspace/cert_block_mcxn9xx.yaml --force
Creating C:\repos\spsdk_master_2.0\examples\jupyter_examples\mcxn9xx_debug_auth\workspace\cert_block_mcxn9xx.yaml template file.
And update template accordingly.
assert os.path.exists(CERT_BLOCK_TEMPLATE)
CERT_BLOCK_BIN = WORKSPACE + "cert_block.bin"

# Create configuration for Certificate Block
with open(CERT_BLOCK_TEMPLATE) as cert_block_config:
    # load yaml configuration to dictionary
    ct = yaml.safe_load(cert_block_config)
    # change paths
    ct['rootCertificate0File'] = ROTK0_PRIVATE_KEY_PATH
    ct['rootCertificate1File'] = ROTK1_PRIVATE_KEY_PATH
    ct['rootCertificate2File'] = ROTK2_PRIVATE_KEY_PATH
    ct['rootCertificate3File'] = ROTK3_PRIVATE_KEY_PATH
    ct['mainRootCertId'] = 0
    ct['iskPublicKey'] = ISK_PRIVATE_KEY_PATH
    ct['containerOutputFile'] = CERT_BLOCK_BIN
    del ct['iskCertData']
    del ct['signPrivateKey']
    del ct['signProvider']
with open(CERT_BLOCK_TEMPLATE, "w+") as cert_block_config:
    print("Certificate Block:")
    pp.pprint(ct)
    # dump the dictionary back to YAML
    yaml.dump(ct, cert_block_config)
Certificate Block:
{   'containerOutputFile': 'workspace/cert_block.bin',
    'iskCertificateConstraint': 0,
    'iskPublicKey': 'workspace/ec_pk_secp384r1_sign_cert.pem',
    'mainRootCertId': 0,
    'rootCertificate0File': 'workspace/ec_pk_secp256r1_cert0.pem',
    'rootCertificate1File': 'workspace/ec_pk_secp256r1_cert1.pem',
    'rootCertificate2File': 'workspace/ec_pk_secp256r1_cert2.pem',
    'rootCertificate3File': 'workspace/ec_pk_secp256r1_cert3.pem',
    'useIsk': False}
Once, we have templates for MBI and for certificate block, we need to update template for MBI accordingly.
MBI_BIN_NAME = "mcxn9xx_mbi.bin"
MBI_CONFIG_PATH = WORKSPACE + "mbi_config_mcxn9xx.yml"
LED_BLINKY = "led_blinky+hello_world.bin"
MBI_OUTPUT_FILE = TEMPLATES_PATH + "/" + "my_mbi.bin"

MBI_TEMPLATE = TEMPLATES_PATH + "/" + "mcxn9xx_xip_signed.yaml"
assert os.path.exists(MBI_TEMPLATE)

# Create configuration for MBI
with open(MBI_TEMPLATE) as mbi_config:
    # load yaml configuration to dictionary
    mbi = yaml.safe_load(mbi_config)
    # change paths
    mbi['rootCertificate0File'] = ROTK0_PRIVATE_KEY_PATH
    mbi['rootCertificate1File'] = ROTK1_PRIVATE_KEY_PATH
    mbi['rootCertificate2File'] = ROTK2_PRIVATE_KEY_PATH
    mbi['rootCertificate3File'] = ROTK3_PRIVATE_KEY_PATH
    mbi['mainRootCertId'] = 0
    mbi['mainRootCertPrivateKeyFile'] = ROTK0_PRIVATE_KEY_PATH
    mbi['rootCertificateEllipticCurve'] = "secp256r1"
    mbi['inputImageFile'] = LED_BLINKY
    mbi['certBlock'] = CERT_BLOCK_TEMPLATE
    del mbi['enableTrustZone']
    del mbi['trustZonePresetFile']
    del mbi['signPrivateKey']
    del mbi['signProvider']

with open(MBI_TEMPLATE, "w+") as mbi_config:
    print("MBI:")
    pp.pprint(mbi)
    # dump the dictionary back to YAML
    yaml.dump(mbi, mbi_config)
MBI:
{   'certBlock': 'workspace/cert_block_mcxn9xx.yaml',
    'family': 'mcxn9xx',
    'firmwareVersion': 0,
    'imageVersion': 0,
    'inputImageFile': 'led_blinky+hello_world.bin',
    'mainRootCertId': 0,
    'mainRootCertPrivateKeyFile': 'workspace/ec_pk_secp256r1_cert0.pem',
    'masterBootOutputFile': 'my_mbi.bin',
    'outputImageAuthenticationType': 'signed',
    'outputImageExecutionTarget': 'xip',
    'outputImageSubtype': 'main',
    'rootCertificate0File': 'workspace/ec_pk_secp256r1_cert0.pem',
    'rootCertificate1File': 'workspace/ec_pk_secp256r1_cert1.pem',
    'rootCertificate2File': 'workspace/ec_pk_secp256r1_cert2.pem',
    'rootCertificate3File': 'workspace/ec_pk_secp256r1_cert3.pem',
    'rootCertificateEllipticCurve': 'secp256r1'}
Now generate final binary.
%! nxpimage $VERBOSITY mbi export -c $MBI_TEMPLATE
assert os.path.exists(MBI_OUTPUT_FILE)
nxpimage  mbi export -c workspace/MBI/mcxn9xx_xip_signed.yaml
RKTH: dc74a049881288ac7cfe74429c73bba49f79ef607452858469fcafe8090b2153
Success. (Master Boot Image: C:/repos/spsdk_master_2.0/examples/jupyter_examples/mcxn9xx_debug_auth/workspace/MBI/my_mbi.bin created.)
Generate final PFR binaries#
# Generate PFR binaries
CFPA_BINARY_OUTPUT = WORKSPACE + "cfpa_mcxn9xx.bin"
CMPA_BINARY_OUTPUT = WORKSPACE + "cmpa_mcxn9xx.bin"
%! pfr generate-binary -c $CFPA_CONFIG_TEMPLATE -o $CFPA_BINARY_OUTPUT
%! pfr generate-binary -c $CMPA_CONFIG_TEMPLATE -e $MBI_TEMPLATE -o $CMPA_BINARY_OUTPUT
pfr generate-binary -c workspace/cfpa_mcxn9xx_debug_auth.yaml -o workspace/cfpa_mcxn9xx.bin
Success. (PFR binary has been generated)
Result has been stored in: C:\repos\spsdk_master_2.0\examples\jupyter_examples\mcxn9xx_debug_auth\workspace\cfpa_mcxn9xx.bin
pfr generate-binary -c workspace/cmpa_mcxn9xx_debug_auth.yaml -e workspace/MBI/mcxn9xx_xip_signed.yaml -o workspace/cmpa_mcxn9xx.bin
Success. (PFR binary has been generated)
Result has been stored in: C:\repos\spsdk_master_2.0\examples\jupyter_examples\mcxn9xx_debug_auth\workspace\cmpa_mcxn9xx.bin
Load binary image + debug auth config into PFR#
%! blhost $UART write-memory 0x0 $LED_BLINKY

%! pfr write $UART -t cfpa -f $FAMILY -b $CFPA_BINARY_OUTPUT
%! pfr write $UART -t cmpa -f $FAMILY -b $CMPA_BINARY_OUTPUT

%! blhost $UART reset
blhost -p COM9 write-memory 0x0 led_blinky+hello_world.bin
Writing memory
Response status = 0 (0x0) Success.
Response word 1 = 9836 (0x266c)
pfr write -p COM9 -t cfpa -f mcxn9xx -b workspace/cfpa_mcxn9xx.bin
CFPA page address on mcxn9xx is 0x1000000
CFPA data written to device.
pfr write -p COM9 -t cmpa -f mcxn9xx -b workspace/cmpa_mcxn9xx.bin
CMPA page address on mcxn9xx is 0x1004000
CMPA data written to device.
blhost -p COM9 reset
Response status = 0 (0x0) Success.
Test debug authentication#
Now we can call authentication command for nxpdebugmbox. Since the board is in the LC=0x3, we need to set value for beacon in order to verify that the authentication truly succeeded. Let’s set beacon to 1.
%! nxpdebugmbox -v -p 2.0 -i jlink auth -b 1 -c $DC_FILE_PATH -k $DCK_PRIVATE_KEY_PATH
nxpdebugmbox -v -p 2.0 -i jlink auth -b 1 -c workspace/debug_auth.dc -k workspace/debug_auth_key_secp256r1.pem
INFO:spsdk.apps.nxpdebugmbox:Starting Debug Authentication
  #   Interface   Id           Description
-------------------------------------------------------------------
  0   Jlink       1063207870   Segger J-Link MCU-Link: 1063207870
INFO:spsdk.apps.nxpdebugmbox:DAC:
Version                : 2.0
SOCC                   : 6, mcxn9xx
UUID                   : 3036353631444D000E00000024001700
CC_VU                  : 0
ROTID_rkh_revocation   : 00000000
ROTID_rkth_hash        : dc74a049881288ac7cfe74429c73bba49f79ef607452858469fcafe8090b2153
CC_soc_pinned          : 00000000
CC_soc_default         : 00000000
Challenge              : 1d3aa0c58508272bab659f8c35242920dc7af2d59da0cfc37ca3e7c279fc96d4

INFO:spsdk.apps.nxpdebugmbox:DAR:
DAC:
Version                : 2.0
SOCC                   : 6, mcxn9xx
UUID                   : 3036353631444D000E00000024001700
CC_VU                  : 0
ROTID_rkh_revocation   : 00000000
ROTID_rkth_hash        : dc74a049881288ac7cfe74429c73bba49f79ef607452858469fcafe8090b2153
CC_soc_pinned          : 00000000
CC_soc_default         : 00000000
Challenge              : 1d3aa0c58508272bab659f8c35242920dc7af2d59da0cfc37ca3e7c279fc96d4

DC:
Version : 2.0
SOCC    : 6, mcxn9xx
UUID    : 00000000000000000000000000000000
CC_SOCC : 0x7ff
CC_VU   : 0x0
BEACON  : 0
CRTK table has 4 entries
CRTK Hash: dc74a049881288ac7cfe74429c73bba49f79ef607452858469fcafe8090b2153
Authentication Beacon: 1

INFO:spsdk.apps.nxpdebugmbox:Debug Authentication ends successfully.
Now read beacon from the memory. The value from the memory should have same values as -b parameter of nxpdebugmbox tool.
%! nxpdebugmbox -i jlink read-memory -a 0x40000FC0 -c 4
nxpdebugmbox -i jlink read-memory -a 0x40000FC0 -c 4
  #   Interface   Id           Description
-------------------------------------------------------------------
  0   Jlink       1063207870   Segger J-Link MCU-Link: 1063207870
00 00 01 00