MC56F81xxx/MWCT2xxx Device HSM and Secure Boot#
This notebook describes how to setup basic secure boot on MC56F81xxx/MWCT2xxx devices using the SPSDK nxpdevhsm and nxpimage applications.
Secure Boot ensures authenticity, integrity and confidentiality of any software during the boot process and ensures that the intended secure level is reached. Secure Boot ensures that only properly signed (Original equipment manufacturer (OEM)-authentic) code can be executed on a device, protecting debug access is of utmost importance. Secure boot provides guarantee that unauthorized code cannot be executed on a given product.
1. Prerequisites#
SPSDK is needed with examples extension.
pip install spsdk[examples](Please refer to the installation documentation.)This example uses KW45xx-EVK/K32W1xx-EVK board
Prepare a plain binary image as an input for the nxpimage tool. There are two sample applications in workspace with OPEN and CLOSED lifecycles.
FAMILY = "mwct20d2"  # change this to your family
WORKSPACE = "workspace/"  # change this to path to your workspace
DATA = "inputs/"  # data folder that contains input images
VERBOSITY = (
    ""  # verbosity of commands, might be -v or -vv for debug or blank for no additional info
)
1.1 Signed image (MBI)#
In the picture below there’s a layout of signed image.
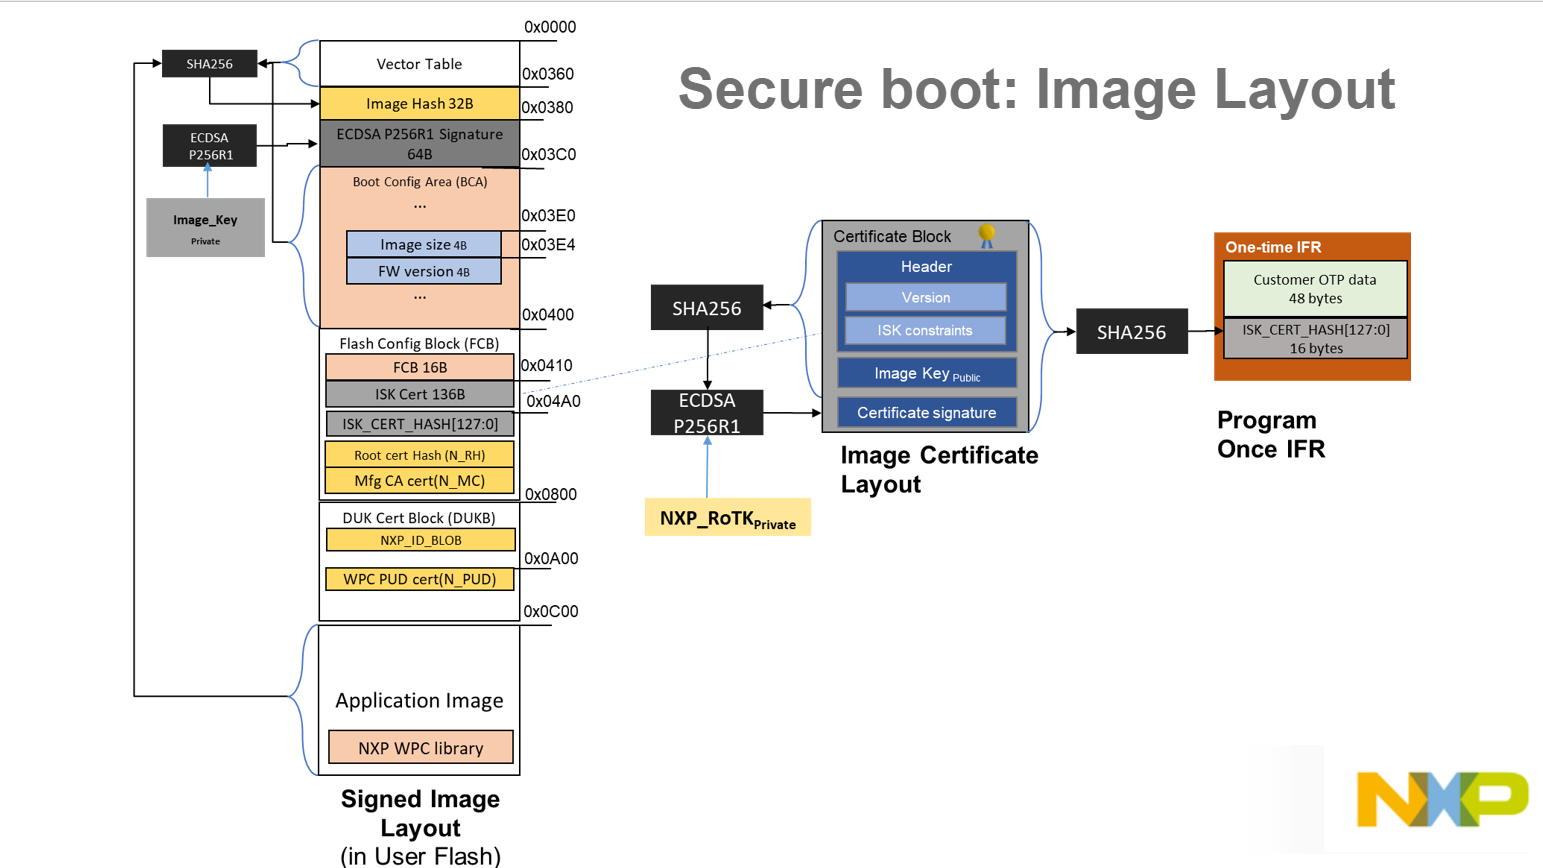
2. Certificate block#
First step is to create certificate block and then signed image.
Certificate block configuration contains ISK certificate, self-signed or NXP signed. If the key is self-signed, signing key or signature provider must be provided. In this example we will use already prepared key-pair from the workspace directory. User should prepare their own key-pair using the nxpcrypto application.
You might use get-template command to obtain template configuration for cert-block.
3. Generate signed image (MBI) and Cert Block#
Template configuration for MBI might be created with get-templates command with proper device family (mc56f81868 or mwct20d2). The only supported outputImageAuthenticationType is signed and outputImageExecutionTarget is xip.
User must provide input binary file built with CodeWarrior that contains properly configured BCA and FCB sections. (Do not forget the lifecycle!. Lifecycle is setup in the application - flash.h). Lifecycle might be updated in the MBI configuration using the lifeCycle property.
addCertHash option will append certificate hash to the offset 0x4A0. This should be only used to test the image before writing certificate hash to IFR. After IFR has been written, it’s no longer necessary to append hash to image.
User should also provide private key or signature provider that will be used for image signature.
Generated MBI should be split to two parts at 0x800 and 0XC00 to exclude DUK Certificate block. This part of memory is write protected, when using the blhost write-memory. However, it could be written using the SBx.
YamlDiffWidget("inputs/mc56_devhsm_mbi.diffc").html
MBI_CONFIG_PATH = DATA + "mbi_xip.yaml"
CERT_BLOCK_CONFIG_PATH = DATA + "cert_block.yaml"

# # export cert block and Master Boot Image
%! nxpimage $VERBOSITY cert-block export -c $CERT_BLOCK_CONFIG_PATH
%! nxpimage $VERBOSITY mbi export -c $MBI_CONFIG_PATH


# # Split MBI into two images at offset 0x0800 and 0x0C00
%! nxpimage  utils binary-image extract -b ./workspace/mb_xip_signed.bin -a 0 -s 0x800 -o ./workspace/mb_xip_signed_0_0x800.bin
%! nxpimage  utils binary-image extract -b ./workspace/mb_xip_signed.bin -a 0xC00 -s 0 -o ./workspace/mb_xip_signed_0xC00.bin
nxpimage  cert-block export -c inputs/cert_block.yaml
ISK Certificate hash [0:127]: 39d0299418cbe826601b8610d9330915

OTP script written to: workspace/otp_script.bcf
Success. (Certificate Block: workspace/cert_block.bin created.)
nxpimage  mbi export -c inputs/mbi_xip.yaml
Success. (Master Boot Image: workspace/mb_xip_signed.bin created.)
nxpimage  utils binary-image extract -b ./workspace/mb_xip_signed.bin -a 0 -s 0x800 -o ./workspace/mb_xip_signed_0_0x800.bin
Success. (Extracted chunk: workspace/mb_xip_signed_0_0x800.bin created.)
nxpimage  utils binary-image extract -b ./workspace/mb_xip_signed.bin -a 0xC00 -s 0 -o ./workspace/mb_xip_signed_0xC00.bin
Success. (Extracted chunk: workspace/mb_xip_signed_0xC00.bin created.)
3.1 ISP Mode#
Prepare device to ISP mode. Connect UART. If the field “peripheralDetection Timeout” in BCA is not set. Default 0xFF means 5 seconds waiting. So issue “nxpdevscan -p” command immediately after powering up the MCU.
# nxpdevscan, list all UART devices
%! nxpdevscan -p
nxpdevscan -p
-------- Connected NXP UART Devices --------

Port: COM89
Type: mboot device
3.2 Programming IFR#
Secure boot might be tested with the hash included in the image. If the secure boot works, we might program IFR using the generated blhost script with blhost batch command or using the OEM Provisioning SBx.
# Set COM port from the previous cell
COM_PORT = "com89"
OTP_SCRIPT = WORKSPACE + "otp_script.bcf"

# You might test the MBI with blhost write-memory, first erase memory
# %! blhost -p $COM_PORT flash-erase-region 0 0x800
# %! blhost -p $COM_PORT write-memory 0 workspace/mb_xip_signed_0_0x800.bin
# %! blhost -p $COM_PORT flash-erase-region 0xc00 0x800
# %! blhost -p $COM_PORT write-memory 0xC00 workspace/mb_xip_signed_0xC00.bin

# Uncomment this if you want to program IFR (WARNING! Irreversible operation)
# %! blhost -p $COM_PORT batch $OTP_SCRIPT
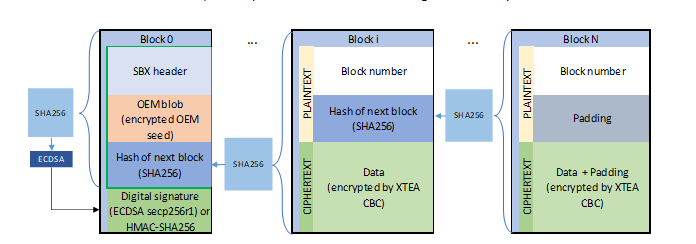
4. Secure FW Update#
Secure update is the process used to securely update the firmware image in the field. The firmware image is encrypted using lightweight symmetric cryptography algorithm and signed using ECDSA P-256, following the SBX firmware image format.
Secure update guarantees authenticity and confidentiality of the new firmware image. It also ensures that the new image is up-to-date, preventing the rollback to an older image. Running firmware is in charge of receiving and verifying the new firmware image.
The follow-up secure boot verifies the new firmware image again, making sure the Immutable RoT is still in charge of ensuring authenticity of the latest firmware. The secure update process includes Secure Binary (SB) container, which encrypts and encapsulates user firmware. Resultant SB file can be distributed to the OEM contract manufacturer, which ensures product manufacturing. Eventually the SB file can be used for product firmware update if it is supported by the product.
SB container supports two ways of firmware update: · OEM/CM Factory Initial Firmware Provisioning (OEM_PROVISIONING) · OEM In-field Firmware Update (OEM) The OEM/CM Factory Initial Firmware Provisioning can be used for initial device programming on the production line. It ensures confidentiality and integrity of programmed user image.
4.1 Device HSM OEM Provisioning#
Create Initial OEM provisioning SBx file using the nxpdevhsm application. In this example we just erase the memory and program the application and reset the MCU.
Template can be created using the nxpdevhsm get-template command.
Our configuration for initial OEM provisioning might look like this:
YamlDiffWidget("inputs/mc56_devhsm_oem_provisioning.diffc").html
SBX_WORKSPACE = WORKSPACE + "SBX/"
SBX_CONFIG = DATA + "oem_provisioning.yaml"
SBX_FILE = WORKSPACE + "oem_open.sbx"
OEM_SHARE_INPUT = SBX_WORKSPACE + "OEM_SHARE_INPUT.BIN"

%! nxpdevhsm $VERBOSITY generate -c $SBX_CONFIG -p $COM_PORT
%! blhost -p $COM_PORT receive-sb-file $SBX_FILE
blhost -p com89 receive-sb-file inputs/workspace/oem_open.sbx
Sending SB file
Response status = 10119 (0x2787) ROM Loader: Pending Jump Command.
4.2 OEM in-field update#
To create a secure binary container that might be used for in-field software update we use “OEM” type in SBx configuration file. We also have to specify private key or signature provider that will be used for signing the container.
YamlDiffWidget("inputs/mc56_devhsm_oem.diffc").html
SBX_FILE = WORKSPACE + "oem_open.sbx"
OEM_SHARE_INPUT = WORKSPACE + "OEM_SHARE_INPUT.BIN"

%! nxpdevhsm $VERBOSITY generate -c $SBX_CONFIG -p $COM_PORT

# NOTE: By default device is reset after nxpdevhsm operation, if you don't want this behavior add --no-final-reset option
%! blhost -p $COM_PORT receive-sb-file $SBX_FILE
blhost -p com89 receive-sb-file workspace/oem_open.sbx
Sending SB file
Response status = 10119 (0x2787) ROM Loader: Pending Jump Command.